Tutorials
Create a new site - change site settings - define access rights

Sites are created with BrainStore's Project Manager. This is also where you define access rights on a per project basis.
Here you can learn more about the Site Settings.
Create a flea-market page with existing case-studies
Add and link pages

To add a page simply edit the page you're are working on and then on the nodes link add a new node...
Add Content with Markdown Syntax

Markdown is a very simple and powerful form of formatting content.
Learn more about Markdown here. Also inspiring: this tutorial.
Some tips for you
Formatting
Bold
**Some text**
Looks like this
Some text
Shortcut: cmd + b
Italic
*Some text*
Looks like this
Some text
Shortcut: cmd + i
Links
To integrate a link to external pages
[Link title you'd like to appear](https://www.google.com)
Looks like this
Link title you'd like to appear
Shortcut: cmd + k
To integrate a link to an internal page
[Link title you'd like to appear](/sitemanager/markdown)
Looks like this
Link title you'd like to appear
To integrate a link to an email address
[Contact Some Body](mailto:some.body@brainstore.com)
Looks like this
To integrate a link to an page and triggering the browser to open a new window
<a href="https://unsplash.com/s/photos/bar" target="_blank">Link to inspiring bar images</a>
Looks like this
Title Sizes
#This is a huge title
This is a huge title
## This is a very big title
This is a very big title
### This is a big title
This is a big title
#### This is a regular title
This is a regular title
##### This is a small title
This is a small title
###### This is a tiny title
This is a tiny title
Images
You can add images to text
You need am Image-URL to do so. You can find this be right-clicking on any image and copy the image address into following text. The width paramater indicated the size of the image in relation to body. Make sure you choose a mobile screen compatible size...
Example 50%
\<img src="https://s3.amazonaws.com/brainstore-d2014/website/node/base/cover_images/000/019/551/cover2x/rec_brain_online_workshops.jpg?2021" alt="Titel" width= 50%>

Example 100%
<img src="https://s3.amazonaws.com/brainstore-d2014/website/node/base/cover_images/000/019/551/cover2x/rec_brain_online_workshops.jpg?2021" alt="Titel" width= 100%>
Example 25%
<img src="https://s3.amazonaws.com/brainstore-d2014/website/node/base/cover_images/000/019/551/cover2x/rec_brain_online_workshops.jpg?2021" alt="Titel" width= 25%>
If your images are not online yet, create a gallery node, add images and get the urls from there.
Tables
Learn more about how to use markdown tables here
Comments?
To add a comment simply type a comment like this
<!-- You won't see this -->
And you won't see this.
If you add a comment in a paragraph make sure you add a new line before.
Special Text Styles
This line of text is meant to be treated as deleted text.
<p><del>This line of text is meant to be treated as deleted text.</del></p>
This line of text is meant to be treated as fine print.
<p><small>This line of text is meant to be treated as fine print.</small></p>
This line rendered as bold text.
<p><strong>This line rendered as bold text.</strong></p>
This line rendered as italicized text.
<p><em>This line rendered as italicized text.</em></p>
Colors
These are the available colors and their usage
Working with colors
You can use any color combination you like.
- You can set the color of the font
- You can set the color of the background
Examples for using colors
Don't forget to close the tags!
This text appears in the primary color with the regular font
<p class="text-primary">This text appears in the primary color with the regular font</p>
This text appears in the primary color with the regular font and strikethrough
<s class="text-primary">This text appears in the primary color with the regular font and strikethrough</s>
This text appears in the danger color with the regular font
<p class="text-danger">This text appears in the danger color with the regular font</p>
This text appears in the success color with the heading 4 (####) font
<h4 class="text-success">This text appears in the success color with the heading 4 (####) font</h4>
This text appears white with the background (bg) beeing warning in the heading 4 style (####)
<h4 class="bg-warning text-white">This text appears white with the background (bg) beeing warning in the heading 4 style (####)</h4>
This black text is highlighted with the network color
<p class="bg-network text-black ">This black text is highlighted with the network color</p>
This black text is highlighted with the network color in a card to get 50%
<div class="card card-body w-50 p-0">
<p class="bg-network text-black p-0">This black text is highlighted with the network color in a card to get 50%</p>
</div>
This black text is highlighted with the network color
<p class="bg-network text-black width=50% ">This black text is highlighted with the network color</p>
<div class="bg-network text-black ">This paragraph is highlighted with the network color. There is no padding. Sed ut perspiciatis unde omnis iste natus error sit voluptatem accusantium doloremque laudantium, totam rem aperiam, eaque ipsa quae ab illo inventore veritatis et quasi architecto beatae vitae dicta sunt explicabo .</div>
This is your title
Sed ut perspiciatis unde omnis iste natus error sit voluptatem accusantium doloremque laudantium, totam rem aperiam, eaque ipsa quae ab illo inventore veritatis et quasi architecto beatae vitae dicta sunt explicabo.
<div class="text-black bg-network p-3">
<h3>This is your title</h3>
<p class="m-0">Sed ut perspiciatis unde omnis iste natus error sit voluptatem accusantium doloremque laudantium, totam rem aperiam, eaque ipsa quae ab illo inventore veritatis et quasi architecto beatae vitae dicta sunt explicabo.</p>
</div>
<div class="p-2 bg-network text-black">Highlight a an entire paragraph and add a box, the p stands for the padding (you can uses values from 1 to 5). Use this e.g. for a disclaimer -text is black background is network. Here some more text: Sed ut perspiciatis unde omnis iste natus error sit voluptatem accusantium doloremque laudantium, totam rem aperiam, eaque ipsa quae ab illo inventore veritatis et quasi architecto beatae vitae dicta sunt explicabo. </div>
<div class="p-2 my-5 bg-network text-black">Add space before and after a paragraph + padding. The my-5 stands for the margin to and bottom being 5 -the padding (you can uses values from 1 to 5). Use this e.g. for a disclaimer -text is black background is network. Here some more text: Sed ut perspiciatis unde omnis iste natus error sit voluptatem accusantium doloremque laudantium, totam rem aperiam, eaque ipsa quae ab illo inventore veritatis et quasi architecto beatae vitae dicta sunt explicabo. </div>
This text uses the danger background and adds bold and italic to it
<p class="bg-danger text-white lead font-italic font-bold">This text uses the danger background and adds bold and italic to it</p>
Add a link in primary color to a light background
<p><a href="www.brainstore.com" class="bg-light text-primary">Add a link in primary color to a light background </a></p>
Inline formating
You can use the "del" tag to mark text as deleted text.
You can use the "s" tag to mark text as as no longer accurate. text.
You can use the "b" tag to to mark text as as bold. text.
You can use the "br" tag to
start a new line in your text.
You can use the "big" tag to include big letters in your text
You can use the "strong" tag to include big letters in your text
You can use the "code" tag to mark text as code in your text
You can use the "u" tag to underline parts of your text
You can use the "small" tag to include small text in your text
You can use the "em" tag for italicized parts of your text
You can use the "sub" tag for sub parts of your text
You can use the "em" tag for italicized parts of your text
You can use the "kbd" tag for kbd parts of your text
You can use the "sup" tag for sup parts of your text
Cards, buttons and badges
Buttons
<a href="https://www.brainstore.com/team" class="btn btn-success">No new tab</a>
Include "target = "_blank" to open a new window
<a href="https://www.brainstore.com/team" class="btn btn-success" target ="_blank">New tab</a>
Cards
<div class="card card-body w-50">
<h1>Please return at 6pm </h1>
<br>
<a href="((link of the main lobby))" class="btn btn-success">Return to the main lobby</a>
</div>
Badges
Highlight
Text before the badge and after
<h1><span class="badge rounded-pill bg-danger text-white">Highlight</span></span></h1>
<h3>Text before <span class="badge rounded-pill bg-success text-white">the badge</span></span> and after</h3>
Mix HTML and Markdown
This is how you can mix HTML and Markdown
Introduction
Markdown simply is a shorthand for HTML
Markdown simply replaces HTML Code.
So the markdown expression
# Hello World
is identical to the HTML Tag
<h1> Hello World </h1>
Combining HTML and Markdown
You can combine Markdown and HTML on one page, as long as you make sure that all HTML blocks are closed before you start with markdown.
<h1>
Hello World
### I love you
</h1>
Leads to this
Hello World ### I love you
And...
<h1>
Hello World
</h1>
### I love you
Leads to this
Hello World
I love you
Start discovery
You can view the chat and return to the lobby anytime. Simply click on the chat icon image
Start Now
Integrate Icons from Fontawsome
BrainStore is subscribed to the Fontawsome Library. Access the library here
User Icon Blue
Camera Icon Black
Siren Orange
Heart Red
<h4 class='mb-2'><i class='fas fa-user text-success mr-2'></i>User Icon Blue</h4>
<h4 class='mb-2'><i class='fas fa-camera text-black mr-2'></i>Camera Icon Black</h4>
<h4 class='mb-2'><i class='fas fa-siren-on text-warning mr-2'></i>Siren Orange</h4>
<h4 class='mb-2'><i class='fas fa-heart text-danger mr-2'></i>Heart Red</h4>
Change the menu - create drop-downs
Every Site comes with a
- Header Menu
- Footer Menu
You can customize your menus to taste
- Add menu-items
- Add sub-menus to menus
- Or sub-menus to sub-menus
The page-type "menu"
Menus have a special page type called menu.
- Every menu has a root node
- Every menu can have children
Children
There are three types of children
1) Redirects e.g. to an external page
2) Linked pages link to a specific page on a site (create a link)
3) Create a menu with the child item of a menu
Bread crumbs
When you start working with menus you will see that every menu item - except for redirects to external pagers creates a so called break crumb path (in German Brotkrümelnavigation! Learn more.
Users will find an intermediary navigation line based on the bread crumb principle.
To access your main menu go to your site settings
They have the type "Menu" and are called
- Header menu of Your Sitename
- Footer menu of Your Sitename
By adding/changing menu items you can adjust the menu however you like.
Working with images: Tips and tools

Tips, important information and tools regarding images on BrainStore's sites
Four things matters
1 Please only use images which are free to use and not protected by copyright.
2 Pay attention to the story the image tells,
3 make sure the images are in the correct aspect ratio (cinema style)
4 and upload them in a high resolution (the number of pixels)
1 Make sure the image is free to use
Please make sure you have the rights to use the image before uploading the image.
2 Quality of the shot
Good images are simple and go with the topic. Not sure if an image works? Ask around.
3 Aspect ratio
Please make sure the uploaded images are the aspect ratio 16 wide x 9 tall. On many cameras you can set this value as a default.
If you select a part of an image (crop it) please make sure the selected part too has the aspect ratio of 16:9.
4 The size
The ideal size for images you upload is 2400px x 1350px or 3840 x 2160. These images show nicely also an large screen with a good resolution.
- Uploading larger images might lead to a system timeout.
- Uploading smaller images might significantly reduce the quality.
Tools for cropping and resizing
- You can use software like Photoshop or free online converters like
- Imageresize https://imageresize.org/
If you only need to resize an image...
With your Mac
Step 1: Select all the images you want to resize.
Step 2: Right click on them and select “Open With Preview.”
Step 3: In Preview, go to Edit > Select All.
Step 4: Once all images are selected, go to Tools > Adjust Size, select pixels and set the value to 2400 x 1350
Create a news page

BrainStore sites offer a powerful tool to create news pages
Create news channels
Define your communities
Make sure you define your communities - this way users will find the news you make available.
To manage communities you currently need to access the Engine linked to the project.
- The members for internal team bulletins are the members of the organizing team
- The members for restricted news appear in the participants overview (you can access e.g. the amassing → community)
- If you want to send out emails you can create a separate protected list for subscribers of your page e.g. with this template.
Aggregate content
Aggregate interesting content and link to news pages
Aggregate any type of content you find interesting
1. Add content
Ideally you simply add content to your news page with the link yoursite.brainstore.com/news.
Set to green, orange or red, depending on the audience.
2. Link contents to sites
Add content to your newssites
- Add all public news to yoursite.brainstore.com/newsletter
- Add all community news to yoursite.brainstore.com/updates (this can contain news from newsletters too...)
- Add all content for the organizing teamyoursite.brainstore.com/bulletin (this can contain news from newsletter and update page too...)
3. If you'd like your newspage to appear on BrainStore's official news page
Send an email to news@brainstore.com
Cool Contents to publish
Images
Interviews
- What happened?
- What new/cool/practical/efficient has been developed, applied, tested?
- What could be exciting?
- Problems/challenges and their solutions
- What's going to happen?
- What would you like to share with us?
- Feedback on (last) newsletter
Important: think of purpose (delight customers, have a good time) and added value
Linked Pages (verify access rights)
Publish content - inform your community
Publish your content and inform your community
Now you can update your site an publish news
Send out an email with the link to the corresponding communities.
Use your community overview sheet to sent updates to your community. Filter by type of memebership. Link your newspage to news.brainstore.com - this way users have a landing page for all their news subscriptions.
Create a timelapse with the OSMO Pocket - Example and Tutorial
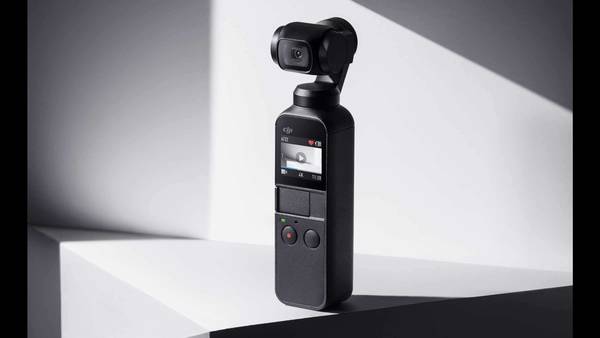
How to create a timelapse with the OSMO pocket
- Find a good spot to place the camera in your location
- Make sure camera is fully charged
- Turn on the camera - right button
- Swipe left to get to the video/photo menu
- Scroll down to timelapse
- Select interval 3 seconds
- Select time unlimited
- Press the red button to start
- Check camera on a regular basis
- For workshops with more than an hour: use a power bank and USB C cable to keep power
Video
VideoShare sites with users
To share a site or a page with users simply copy the URL after saving the page.
If you want an page to appear in a certain language simply add the language code to the URL
https://www.brainstore.com/de/tools/brainstorming-tools will lead to the German page
https://www.brainstore.com/en/tools/brainstorming-tools will lead to the English page
https://www.brainstore.com/tools/brainstorming-tools will take the language setting of the User or the browser settings if no language settings is available.